Associate Disclosure: By way of purchasing the goods we suggest, you lend a hand stay the website alive. Learn extra.
Do you’re employed with a large number of photographs at one time? Possibly you could have a big workforce of pictures you want to resize to a constant measurement and convert from PNG to JPG. As an alternative of fixing every symbol one by one, there are simple techniques to temporarily batch convert and resize photographs to your Mac.
Beneath, we take a look at the use of the integrated equipment in Preview and Automator to batch convert and resize photographs. We’ll additionally introduce a few third-party apps that may do the trick with some additional options thrown in.
For this information, we’ll mix changing and resizing. However you’ll additionally do every one by one to your batch of pictures.
Batch Convert and Resize Photographs The use of Preview
The integrated Preview app has been round a very long time on macOS, and you’ll do a lot more with Preview 10 Very important Guidelines and Tips for Preview at the Mac Preview is an unassuming app that may do the activity of part a dozen standalone utilities. Learn Extra than simply view photographs. One hidden however helpful function is the power to batch convert and resize a big workforce of pictures.
In Finder, choose a bunch of symbol information, and right-click on them. Move to Open With > Preview. You probably have the Preview icon to your Dock, you’ll additionally drag the chosen information onto the Preview icon to open them. From there:
- Click on within the left pane then press Cmd + A, or click on Edit > Choose All from the menu bar to make a choice all of the photographs.
- Choose Gear > Regulate Dimension from the menu bar.
- Select the gadgets you need to make use of (pixels, p.c, inches, cm, mm, or issues) from the dropdown field to the correct of the Width and Top fields.
- If you need the Top to regulate routinely whilst you input the Width, or vice versa, make sure you take a look at the Scale proportionally field.
- Input values for one or each the Width and Top and click on OK.
- Notice that in case your photographs are all other sizes, you might need to use p.c, as it’s relative to the unique measurement.

Now, let’s convert the photographs. Batch symbol conversion in Preview works with nearly all symbol codecs, together with GIF, JPEG, JPEG-2000, BMP, Photoshop PSD, PNG, TIFF, or even PDF. You’ll convert any selection of symbol information the use of this.
To start out changing in Preview:
- Ensure that all of the photographs are nonetheless decided on and cross to Document > Export Decided on Photographs.
- Navigate to the folder the place you need to avoid wasting the photographs and click on Choices to expose the Layout dropdown listing.
- Choose the specified layout, optionally modify the to be had settings, and click on Select.

Batch Convert and Resize Photographs The use of Automator
Automator is a formidable, integrated application to your Mac that lets you create customized automation apps with out realizing any coding. Don’t be intimidated by way of Automator—it’s simple to make use of.
The use of a customized Automator app to batch convert and resize a bunch of pictures is quicker than the use of Preview. While you create a workflow within the Automator app Discover ways to Use Mac Automator With 6 At hand Instance Workflows Just a little little bit of endurance and creativity are all you want to begin automating your Mac — you do not wish to know a unmarried line of code. Learn Extra , reserve it as an utility, and upload it for your Dock, you’ll merely drag and drop photographs onto the icon.
To start out a brand new Automator record:
- Open Automator out of your Packages folder (or seek for it the use of Highlight with Cmd + House) and click on New Report.
- At the Select a sort in your record conversation field, click on Software after which hit Select.
There are two primary sections at the Automator window: Movements and Variables are at the left, whilst the workflow is at the appropriate. The method of establishing an Automator workflow comes to deciding on the kind of Motion or Variable you need after which dragging it into your workflow.
In essence, you’re development a step by step procedure that tells Automator what to do with the information you give it.
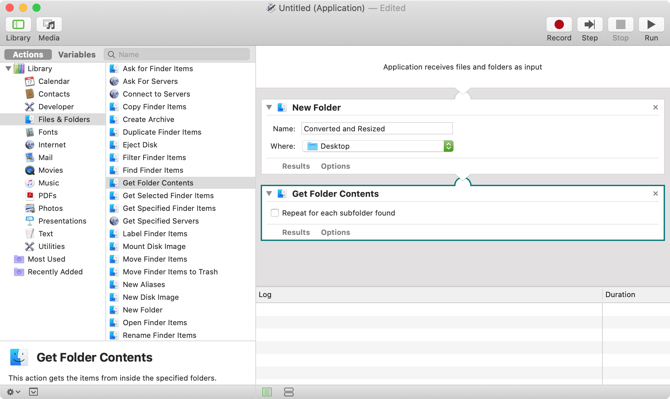
Create a New Folder
First, we’re going to have Automator create a folder to put the transformed and resized photographs into.
Ensure that Movements is chosen appropriate beneath the toolbar. Choose Recordsdata & Folders beneath Library at the left. Subsequent, to find the New Folder motion in the second one column and drag it to the workflow at the appropriate. After this, the New Folder motion is installed position originally of the workflow, with some choices at the motion field.
Input a reputation for the brand new folder within the Title field. By way of default, this new folder shall be created at the Desktop, however you’ll make a choice any other location the use of the The place dropdown listing.

Get the Photographs
Up to now, we’ve advised Automator to take the photographs you drag onto the app icon and replica them to the brand new folder. Now, we wish to inform Automator to make a choice the photographs to switch.
Beneath Library, choose Recordsdata & Folders. Subsequent, drag the Get Folder Contents motion to the ground of the workflow.
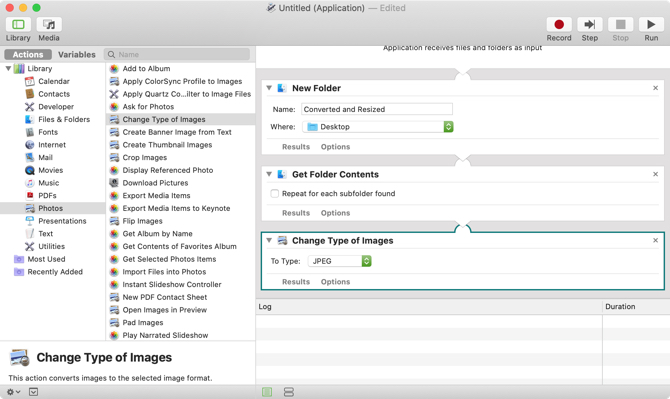
Convert the Photographs
The next move is to inform Automator to transform the photographs. Beneath Library, choose Footage, after which drag the Exchange Form of Photographs motion to the ground of the workflow.
A conversation shows asking should you’d like so as to add a Reproduction Finder Pieces motion to the workflow so the picture information shall be copied, protecting your authentic information.

As a result of we added an motion to the workflow that may create a brand new folder, we don’t wish to make copies of the unique information. The New Folder motion will deal with that. So click on Don’t Upload at the conversation field.
At the Exchange Form of Photographs motion field within the workflow, choose your required symbol layout from the To Sort dropdown listing. This may take the photographs you’ve added the use of the Get Folder Contents motion and convert them to the chosen symbol layout.
Resize the Photographs
If you happen to additionally need to resize your photographs, you’ll upload an motion that may scale all of them. Beneath Library, choose Footage. Subsequent, drag the Scale Photographs motion to the ground of the workflow.
Choose whether or not you need to transform the photographs to a selected measurement in pixels or the use of a share from the dropdown listing. Input the quantity in pixels or the share within the field. As discussed previous, should you’re operating with photographs of more than a few sizes, you might need to use By way of Share as it really works relative to the unique measurement.

You’ll be requested once more should you’d like so as to add a Reproduction Finder Pieces motion to the workflow to keep a copy of the unique information. Once more, click on Don’t Upload.
Save the Software and Upload It to Your Dock
We’re completed growing our workflow. Now, it’s time to reserve it as an app. Move to Document > Save. Navigate to the place you need to avoid wasting your app and input a reputation for the app within the Save As field on the most sensible of the conversation field. Subsequent, click on Save.
In the end, drag the Automator app document you simply stored to the Dock for simple get admission to.
Convert and/or Resize the Photographs
To transform and resize a batch of pictures, choose the picture information and drag them onto the app icon at the Dock.

Relying at the quantity and measurement of the chosen photographs and the rate of your Mac, after a couple of seconds or mins, you’ll have a brand new folder to your Desktop containing the transformed and resized photographs. This preserves the unique information, so that you don’t have to fret about any irreversible adjustments.
Batch Convert and Resize Photographs The use of a 3rd-Celebration App
There also are third-party apps you’ll set up to your Mac to transform and resize your photographs. Listed below are a pair so that you can imagine.
XnConvert

XnConvert is a loose program that makes it simple to batch convert and resize photographs. As well as, it may possibly carry out many different movements on photographs, like rotating/cropping and adjusting the brightness, distinction, and saturation. You’ll additionally use it to use blur, emboss, and sharpen filters, or upload covering and watermarking results.
Upload your photographs at the Enter tab. Subsequent, upload an motion at the Movements tab to resize the picture by way of pixels, p.c, inches, cm, or mm and specify the Width and Top values.
At the Output tab, choose the folder for the transformed information and make a choice a layout you need to transform to. You’ll additionally customise the document names and modify every other choices.
While you’re able to transform your photographs, click on Convert.
Obtain: XnConvert (Loose)
ImageSize

With ImageSize, you’ll batch resize, convert, and rename your symbol information and stay the unique facet ratio from them. You’ll resize photographs by way of pixels, p.c, or fastened width or top. Enter and output codecs come with the preferred varieties like JPG, JPEG, PNG, TIFF, GFT, BMP, and extra.
Upload your photographs at the ImageSize window and set the resize choices at the Resize tab at the appropriate. Then click on the Output tab, pick out the picture Layout you need, and choose the Output Folder.
Click on Resize Photographs at the Output tab to resize and convert your photographs and save them to the chosen folder.
Obtain: ImageSize ($three.99)
Want Extra Choices for Mac Symbol Conversion?
Now you understand how to resize and convert any symbol to your Mac with none bother. Whether or not you do that hardly or on a daily basis, those strategies make it easy.
If you happen to’re on the lookout for a extra robust instrument for jobs like this, take a look at the most productive symbol editors in your Mac The eight Absolute best Loose and Paid Symbol Editors for Mac Listed below are the most productive loose and paid Mac symbol editors, whether or not you are a skilled skilled or beginner shutterbug. Learn Extra .
Symbol Credit score: tan4ikk/Depositphotos


